WXTのcontent scriptsの書き方
ブラウザの拡張機能のフレームワークWXTでは、content scriptでUIを差し込むパターンがいくつか用意されています。本記事では、その書き方と実践的な実装を紹介します。
WXTの概要を知りたい方は以前書いた記事WXTとSvelteでChrome拡張機能の開発をご覧ください。
## content scripts構成
WXTでは、Popup、Background、Content Scriptのような機能ごとにエントリーポイントを分けます。
エントリーポイントは次のようにディレクトリを切っても切らなくてもよいです。
entrypoints/content/index.tsentrypoints/content.ts
content scriptの場合、最初からディレクトリを使った方が、構成やコードがすっきりして分かりやすくなると思います。
## エントリーポイントに書く内容
content scriptのエントリーポイントにdefineContentScriptを使って差し込む内容を定義します。
先に簡単な例を見てみましょう。
import App from "./App.svelte";
export default defineContentScript({ matches: ["https://example.com/"], main(ctx) { const ui = createIntegratedUi(ctx, { position: "overlay", anchor: "body > div", onMount: (container) => { const app = new App({ target: container, }); return app; }, onRemove: (app) => { app?.$destroy(); }, }); ui.mount(); },});matchesがcontent scriptを実行するURLです。manifestのmatchesですね。
mainがcontent scriptで実行する処理です。
### UIを差し込む
UIを差し込む場合、便利な関数が3つ用意されています。
createIntegratedUicreateShadowRootUicreateIframeUi
先にこの3つの違いを説明します。共通の引数はのちほど紹介します。
### createIntegratedUi
createIntegratedUiを使うと、特に工夫もせずUIがそのまま差し込まれ、ページのCSSの影響を受けます。
content scriptでUIを追加する場合は既存のデザインと合わせることが多いため、この関数はよく使いそうです。
デフォルトではルートとなるタグはdivですが、tagオプションで変更できます。
const ui = createIntegratedUi(ctx, { position: "overlay", anchor: "body > div", onMount: (container) => { const app = new App({ target: container, }); return app; }, onRemove: (app) => { app?.$destroy(); }, tag: "wxt-content-script",});ui.mount();例のようにカスタム要素の指定も可能です。
CSSのセレクタとしてdivのように指定されている場合に、その影響を減らせます。
IntegratedContentScriptUiOptions
### createShadowRootUi
createShadowRootUiを使うと、UIはShadow DOMとして差し込まれます。
Shadow DOMを使うことでカプセル化され、ページのCSSの影響を受けずにUIを書けます。逆にページもUIのCSSの影響を受けません。
とはいえ、完全に分離されているわけではなく、一部のスタイルは通常のDOMから継承されます(参考:HTML Web Components とは何か | grip on minds)。
createShadowRootUiを使う場合はcssInjectionModeの指定やmainがasync mainに書き換えるなど他の2つと少し違う書き方になります。公式ドキュメントをよく読みましょう。
import './style.css';import App from './App.svelte';
export default defineContentScript({  matches: ['<all_urls>'],  cssInjectionMode: 'ui',
  async main(ctx) {    const ui = await createShadowRootUi(ctx, {      name: 'example-ui',      position: 'inline',      onMount: (container) => {        const app = new App({          target: container,        });        return app;      },      onRemove: (app) => {        app?.$destroy();      },    });    ui.mount();  },});
### createIframeUi
createIframeUiはUIをiframeとして挿入します。
iframeを使う場合は別途htmlファイルの準備やmanifestでweb_accessible_resourcesの指定が必要です。こちらも公式ドキュメントが圧倒的に分かりやすいです。
正直使い所がパッと思いつかないため、何かあれば追記しようと思います。
## UIの配置方法
UIの配置方法はpositionで決めます。anchorはUI挿入時の起点となるセレクタや要素を指定します(後述)。
const ui = createIntegratedUi(ctx, { position: "overlay", anchor: "body > div", onMount: (container) => { const app = new App({ target: container, }); return app; }, onRemove: (app) => { app?.$destroy(); },});positionは3種類あります。次の画像は公式ドキュメントより引用です。

次の項目からそれぞれを詳しく解説します。
Type alias: ContentScriptPositioningOptions – WXT
### inline
inlineは文字どおりインラインで配置します。一番使いそうですね。
Interface: ContentScriptInlinePositioningOptions – WXT
### overlay
overlayは重ねて表示されます。
alignmentで起点に対するUIの位置を決めます。次の画像は公式ドキュメントより引用です。

画像では右下になっていますがこれはあくまでも一例です。
overlayを使うと、「0x0ピクセルの要素」が「挿入されるUIのルート」として用意されます。これが起点です。
起点の具体的な挿入位置はanchorやappendで指定できます(後述)。
実装を見た所createIntegratedUiを使った場合は挙動が違うようです(参考1、参考2)。
Interface: ContentScriptOverlayPositioningOptions – WXT
### modal
modalを使うとUIが全体に広がり、モーダルのようになります。
overlayと同じく、createIntegratedUiを使った場合は挙動が違うようです(参考1、参考2)。
次はShadowRoot(Shadow DOM)で使った例です。
const ui = await createShadowRootUi(ctx, { name: "example-ui", position: "modal", anchor: "body > div", onMount: (container) => { const app = new App({ target: container, }); return app; },});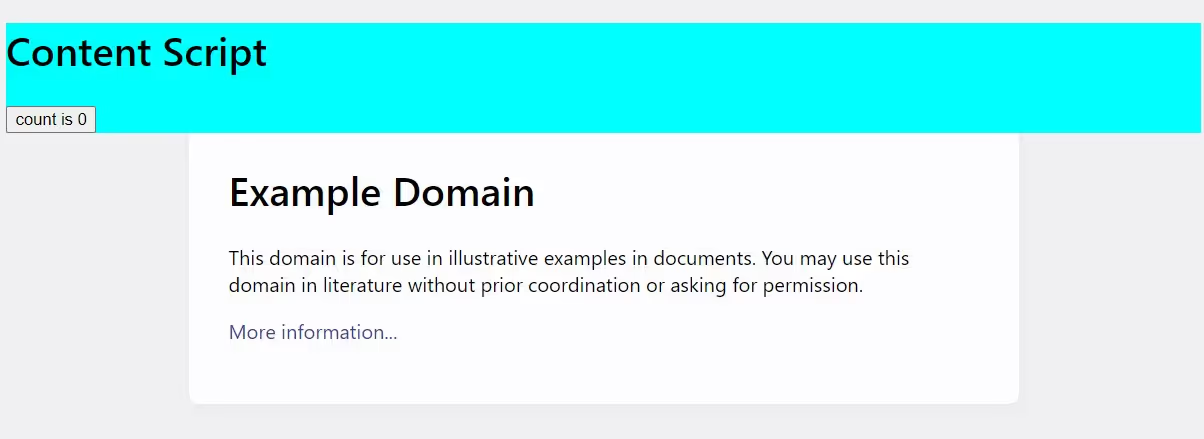
content scriptの内容が画面全体に広がっていますね。
Interface: ContentScriptModalPositioningOptions – WXT
## タグの挿入方法
ここからはHTMLのタグがどのように挿入されるか決定するオプションを解説します。
### anchor
anchorはUI挿入時の起点となる要素を指定します。具体的にはセレクタとなる文字列や要素を書きます。
文字列の場合はdocument.querySelector(anchor)のように処理されます。
const ui = createIntegratedUi(ctx, { anchor: "body > div", // ... });},一方、要素を直接渡すとそのままマウントしてくれます。
async main(ctx) { const anchor = document.querySelector("body > div"); const ui = createIntegratedUi(ctx, { anchor: anchor, // ... });},() => undefined | null | string | Elementのような関数も書けるっぽいです。
Interface: ContentScriptAnchoredOptions – WXT
### append
anchorの要素を基準に、どのように拡張機能側のタグを挿入するかをappendで指定します。
次の画像は公式ドキュメントより引用です。
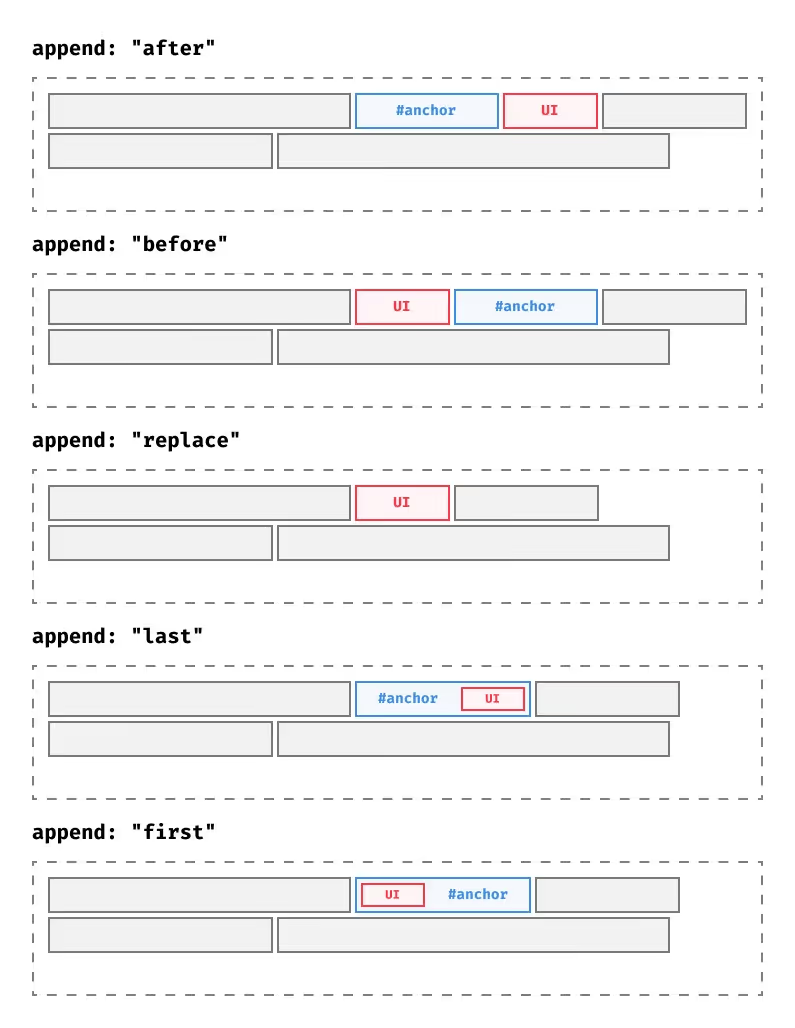
HTMLの挿入の関数appendやinsertBeforeなどを自分で調べるよりも直感的で扱いやすいです。
Interface: ContentScriptAnchoredOptions – WXT
Type alias: ContentScriptAppendMode – WXT
## 要素の出現を待つパターン
content scriptでよくある
「ある要素の出現を待ってからマウント」
の例を書いておきます。
関数自体はWXT以外でも使えます。
### 要素の出現を待つ関数
まずは要素の出現を待つ関数を実装します。MutationObserverとsetIntervalそれぞれの例を紹介します。
#### MutationObserverを使うパターン
MutationObserverを使ってDOMの変更を監視して要素を見つけるパターンです。
export async function waitForElement(  selector: string,): Promise<Element | undefined> {  return new Promise((resolve) => {    const elm = document.querySelector(selector);    if (elm) {      console.log("最初に見つかった");      return resolve(elm);    }
    const observer = new MutationObserver((mutations) => {      for (const mutation of mutations) {        for (const node of mutation.addedNodes) {          if (node instanceof Element && node.matches(selector)) {            observer.disconnect();            clearTimeout(timeout);            console.log("差分で見つかった");            return resolve(node);          }        }      }    });    const timeout = setTimeout(() => {      observer.disconnect();      console.log("見つからなかった");      return resolve(undefined);    }, 10000);    observer.observe(document.body, {      childList: true,      subtree: true,    });  });}
少し長ったらしく見えるかもしれませんがやっていることは単純です。
- セレクタで指定した要素があれば返す
- なければDOMの変更の監視を開始
- 出現したら返す
- 10秒経っても出現しなければ
undefinedを返す
#### setIntervalを使うパターン
setIntervalを使い、0.5秒おきにdocument.querySelectorを実行するパターンです。
export async function waitForElement(  selector: string,): Promise<Element | undefined> {  return new Promise((resolve) => {    let elm = document.querySelector(selector);    if (elm) {      console.log("最初に見つかった");      return resolve(elm);    }
const timer = setInterval(() => { elm = document.querySelector(selector); if (elm) { clearInterval(timer); clearTimeout(timeout); console.log("途中で見つかった"); return resolve(elm); } }, 500); const timeout = setTimeout(() => { clearInterval(timer); console.log("見つからなかった"); return resolve(undefined); }, 10000); });}「要素の出現を待つ関数」の実装については、Stack Overflowで10年以上議論されている伝説の質問に他の実装も載っています。
### mainの実装
上記の関数を使ってdefineContentScriptのmainを書いたのが次の例です。
async main(ctx) { const anchor = await waitForElement("selectoooooooooooooooor"); if (typeof anchor === "undefined") { return; } const ui = createIntegratedUi(ctx, { position: "inline", anchor: anchor, append: "first", onMount: (container) => { // TODO: svelteの例なので適宜書き換え const app = new App({ target: container, }); return app; }, onRemove: (app) => { app?.$destroy(); }, tag: "extension-name-hereeeeeeeeeeeeeee", }); ui.mount();},要素が見つからなければマウントしない、という単純な構成です。残りの部分は今までで解説したとおりです。
WXTを使ったcontent scriptの実装を紹介しました。
UIの挿入はたくさんの実装方法があります。
WXTではある程度パターン化でき、「どこに何をマウントするのか」が書きやすく読みやすいので重宝しそうです(特にappend)。
今回紹介したコードを動かしたい方向けに次のリポジトリを用意しました。参考程度にどうぞ。
eetann/wxt-content-script | GitHub