codecompanion.nvimのworkspaceの作り方・使い方
codecompanion.nvimのworkspace機能の使い方を解説します。
CodeCompanion全体の使い方は別の記事NeovimのAIプラグインcodecompanion.nvimの使い方に書きました。まだ使ったこと無い人はまずはこちらをご覧ください。
## workspaceとは?
workspaceはLLMに伝えるコンテキストを管理できる機能です。
プロジェクトの概要やディレクトリ構成を毎回伝える必要がなくなります。プロジェクトでよく使う指示もまとめて管理・LLMに共有できます。
のちほど解説しますが、伝えられるコンテキストは次のとおりです。
- プロジェクトの概要
- システムプロンプト
- ファイルとその説明
- シンボルとその説明
- URLとその説明
## workspaceを使う流れ
workspace機能を使うときは次のような流れになります。
codecompanion-workspace.jsonにコンテキストを書く- チャットで
/workspaceというスラッシュコマンドを使う - 共有したコンテキストをもとに質問
見てのとおりcodecompanion-workspace.jsonというファイルの準備が必要です。
自分で書くのが面倒な人向けに、AIに書かせる方法も紹介します。
## codecompanion-workspace.jsonの書き方
先にcodecompanion-workspace.jsonの全体の構造を載せます。次の項目から小分けにして解説します。
{ "name": "Task app API Documentation", "version": "1.0.0", "workspace_spec": "1.0", "description": "This workspace contains API documentation related to the task app, formatted in OpenAPI YAML files.", "system_prompt": "Ensure all summaries and descriptions in the OpenAPI YAML files are written in Japanese.", "groups": [ { "name": "API Documentation", "system_prompt": "All YAML documents are divided and placed under `openapi/` The root is located at `openapi/index.yaml`.", "files": [ { "description": "Root file for OpenAPI specifications.", "path": "openapi/index.yaml" }, { "description": "Contains path definitions for the API.", "path": "openapi/paths/index.yaml" }, // ... { "description": "ER diagram written in mermaid format", "path": "docs/er.md" } ], "symbols": [], "urls": [ { "auto_restore_cache": true, "description": "参考サイト", "url": "https://exmaple.com" } ], } ]}### メタ的な部分
{ "name": "Task app API Documentation", "version": "1.0.0", "workspace_spec": "1.0", "description": "This workspace contains API documentation related to the task app, formatted in OpenAPI YAML files.", // ...}nameにはプロジェクト名を書いておきます。
versionとworkspace_specは実際にはまだ使われませんが、今後使われる可能性が高いので公式ドキュメントどおり書いておきます。descriptionはLLMには送信されない項目です。人間向けに一言書いておきます。
### system_prompt
{ // ... "system_prompt": "Ensure all summaries and descriptions in the OpenAPI YAML files are written in Japanese.", // ...}system_promptには「プロジェクトの概要やあらかじめ指示しておきたい内容」を書きます。
### groups
Groupsにはまとめて読み込みたい単位でファイルやURLをグループ化しておきます。
{ // ... "groups": [ { "name": "API Documentation", "system_prompt": "", "files": [], "symbols": [], "urls": [], } ]}実際にスラッシュコマンド/workspaceで読み込むときは、このgroupsに書かれた単位で読み込むかどうかを選択します。
たとえば、次のように「機能毎に関係ファイル・URLをまとめたもの」や「プロジェクトでよく使うプロンプト」をまとめておけます。
{ // ... "groups": [ { "name": "API Documentation", "system_prompt": "All YAML documents are divided and placed under `openapi/` The root is located at `openapi/index.yaml`.", "files": [ { "description": "Root file for OpenAPI specifications.", "path": "openapi/index.yaml" }, ], }, { "name": "Tsundere mode", "description": "回答をツンデレモードにします", "system_prompt": "回答はツンデレ風にお願いします" } ]}「ツンデレモード」のようにファイルとは関係ないプロンプトだけのグループも設定可能です。
#### groups.name
ここからは、各グループに各内容を解説します。
nameは選択するときに表示される名前です。
{ "groups": [ { "name": "API Documentation", } ]}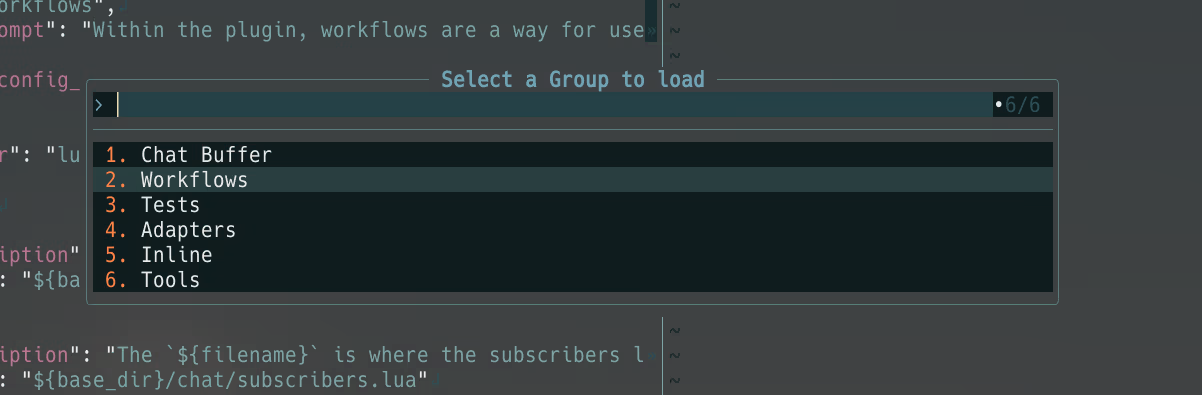
人間に分かりやすければOKです。
#### groups.system_prompt
system_promptは文字どおりシステムプロンプトです。
{ // ... "groups": [ { "name": "API Documentation", "system_prompt": "All YAML documents are divided and placed under `openapi/` The root is located at `openapi/index.yaml`.", }, ]}#### groups.description
groupsのdescriptionの内容は、ユーザープロンプトとして追加されるようです。
{ // ... "groups": [ { "name": "API Documentation", "description": "これはユーザープロンプトとなる", }, ]}#### groups.vars
varsには変数を定義できます。何度も出てくる長めのディレクトリ名・ファイル名を書いておくと便利です。
${foo}のように参照できます。
{ // ... "groups": [ { // ... "vars": { "base_dir": "lua/codecompanion/strategies/chat" }, "files": [ { "description": "the entry point for the chat strategy. All methods directly relating to the chat buffer reside here.", "path": "${base_dir}/init.lua" } ], } ]}#### groups.files
filesには「ファイルの説明とパス」のリストを書きます。
{ // ... "groups": [ { // ... "files": [ { "description": "The `${filename}` file is the entry point for the chat strategy. All methods directly relating to the chat buffer reside here.", "path": "${base_dir}/init.lua" } ], } ]}${filename}のような同じスコープ内のファイル名を参照できる変数は自分で定義しなくても使えます。
他の変数については公式ドキュメントをご覧ください。
#### groups.symbols
symbolsはほとんどfilesと同じような感じです。symbolsの方だとTree-sitterを使って抽出したシンボルだけをLLMに送信する、という点が違います。ロジックをLLMに送信しなくてよいなら、symbolsの方がトークンを節約できるのです。
{ // ... "groups": [ { // ... "symbols": [ { "description": "References are files, buffers, symbols or URLs that are shared with an LLM to provide additional context. The `${filename}` is where this logic sits and I've shared its symbolic outline below.", "path": "${base_dir}/references.lua" } ], } ]}#### groups.urls
urlsにはLLMに送りたいURLの配列を書きます。
{ // ... "groups": [ { // ... "urls": [ { "auto_restore_cache": true, "description": "I've also included a link to my README:", "url": "https://raw.githubusercontent.com/olimorris/codecompanion.nvim/refs/heads/main/doc/codecompanion.txt" } ], } ]}ここに書いたURLは、フェッチされた内容がキャッシュされます。このキャッシュの挙動を制御したい場合は次の2つのキーを設定してあげましょう。
ignore_cache:trueならキャッシュさせないauto_restore_cache:trueならユーザーに確認をとらずにキャッシュを使う
## codecompanion-workspace.jsonをAIに書かせる方法
プロジェクトが小規模の場合は、例となるJSONファイルをコピペして自分で作成したほうが速いです。
面倒な人向けにAIに書いてもらう例も紹介します。
@full_stack_devあなたは、プロのLLM専門家です。以下の制約条件と入力文をもとに、`codecompanion-workspace.json`を出力してください。

### 制約条件:`codecompanion-workspace.json`の書き方は添付したURLを参考にしてください。

### 入力文:このリポジトリはタスク管理アプリのAPIドキュメントを管理するものです。APIドキュメントはOpenAPIに則ってYAMLファイルに書いています。YAMLファイルは分割して書いています。ルートとなるファイルは`openapi/index.yaml`です。`openapi/paths`に`path`、`openapi/components`に`components`を書く感じで分割しているのです。
docs/er.mdはER図、docs/openapi.jsonが`openapi/*`以下をバンドルしたOpenAPIのファイル、`docs/*`がVitepressでのドキュメント生成に必要なファイルです。
OpenAPIのYAMLファイルの`summary`や`description`のような説明書きの部分は日本語を書くようにシステムプロンプトに追加してください。
その他、`codecompanion-workspace.json`の作成にあたって私に質問しなければならない場合は、質問してください。
「入力分」の内容は、treeコマンドの結果に追記する形のほうがいいかも?
codecompanion-workspace.jsonの書き方をAIに教える方法は次のいずれか。
sitefetchについては別の記事ページをAIに食わせる用に変換するツールsitefetchの使い方をご覧ください。
## 日本語でもいい?
日本語でも問題なくツンデレモードが動きました。
以上、CodeCompanionのworkspace機能の解説でした。
「ちょっととっつきにくい機能かな」と思っていたのですが、やっぱりドキュメントを読みつつ手を動かすと難しくないです。